
You have the effective Windows 7 OS set up on your computer system, which some think about to be the epoch of contemporary OS, the apotheosis of compatibility, stability, and interoperability. Nevertheless, as durable as Windows 7 is, it does not showcase everything. If there were something you really wanted or had to do that Windows 7 just weren't able to assist in, your finest alternative would be to make use of a virtual machine.
Exactly what is a Virtual Machine ?
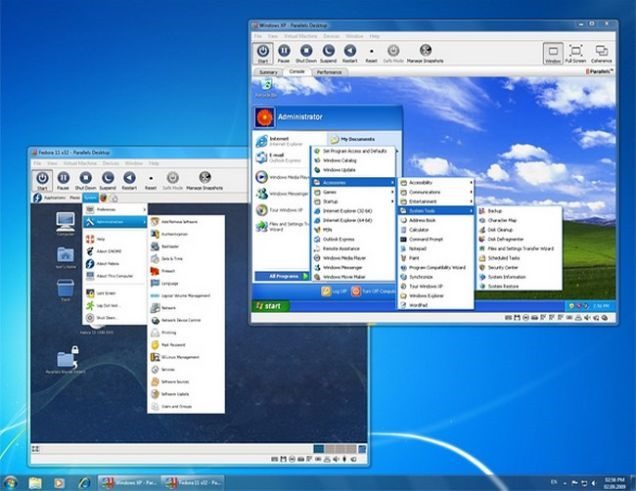
A virtual machine is precisely what it seems like: an imitated computer system within your computer system. A virtual machine permits the user to run a various os in a window as if it were a program. This indicates that a Windows 7 user might run Windows Vista, Windows XP, and even some variations of Mac OSX without ever logging out of Windows 7 and change backward and forward in between the 2 systems at will. Almost anything that will certainly run natively on a certain os will certainly run in a virtualized variation of the OS, so it's a fantastic means to press the most value and compatibility from your Windows 7 purchase.There are numerous alternatives offered to Windows 7 users wishing to dive into the world of virtualization, however the most convenient is Microsoft Virtual PC.
Microsoft Virtual PC is a complimentary virtualization platform from Microsoft for Windows 7 users. It has 2 modes: Windows XP VM and Windows XP Mode. The "VM" means "Virtual Machine" and is an opportunity with which you can run a copy of the Windows XP desktop within Windows 7. Windows XP Mode is a scaled-down virtual machine that will certainly faster run Windows XP-compatible programs within a Windows 7 environment without the have to begin a virtual machine.
MVPC is readily available right here: Microsoft Virtual PC. After it's downloaded, set up, and the computer system has actually been rebooted, browse to Virtual PC in your Start Menu.
How to Create a Windows XP Virtual Machine
- So after you have downloaded and installed it onto to your system, open Virtual PC from the Start Menu.
- Choose "Create Virtual Machine".
- Select a name for your brand-new VM and wait to an area where you'll bear in mind.
- On the next screen, you need to choose just how much of your system RAM to provide the virtual machine while it's running. For many Windows XP applications, 1GB (or 1024 MB) will certainly be sufficient without triggering too much of an efficiency hit in Windows 7. If you'll be running XP programs that require even more than 1 GB, assign more, simply realize that RAM offered to the VM will not be utilized by Windows 7 up until the VM is closed.
- In the "Networking" box, you can make it possible for or disable the virtual machine's capability to link to your house network and the web. If it's unattended, it will certainly be an entirely offline machine. If you're uncertain, leave it inspected. You can constantly disable specific networks from within the VM's OS later on.
- Pick a hard drive approach for your VM. You might pick from a vibrant drive which will certainly broaden or diminish depending on the requirements of the OS, an existing disk from a previous setup, or a repaired size partition under sophisticated alternatives. If you're not sure just how much area you'll require and have a little hard drive area to extra, select vibrant. If you're like us and wish to offer yourself an allowance since you have a practice of filling hard disk drives indiscriminately, taken care of is the means to go. 20GB is typically sufficient for the couple of programs that do not run in Windows 7.
- Select a name for the disk (this is various from selecting a name for the machine) and an area to wait someplace you have some adequate hard drive area. Not just will you require area to set up the XP OS, you'll require additional area for programs, so make certain you will not be putting a stress on either OS by not designating adequate area. If you selected "Dynamically Expanding," you can define simply just how much area the disk can contend optimum.
- After completing the wizard you'll be brought back to the Microsoft VPC explorer. Right-click on your newly-created VM and select "Settings."
- You'll need to set up Windows XP to the VM. Left wing, pick "DVD Drive." If you have a Windows XP setup disc, pop it in to your physical drive on your computer system and select "Access a Physical Drive" on the right and choose the matching letter drive for your DVD drive (generally D: or E:, if you're not sure, click Start > Computer and search for the very first drive you see with a DVD drive icon and utilize its letter). Additionally, if you're a sophisticated user you can utilize an ISO file you downloaded from the web or torn from your XP disc.
- Lastly, follow the setup steps onscreen when setting up XP and you'll be working in no time.
After that, you might introduce MVPC from your beginning menu. Double-click on your machine from the list, or right-click and pick "Open." Your virtual machine will certainly run much like a routine Windows XP machine, the only distinction is that it's within windows 7.
(COMMENTS WILL LOAD AUTOMATICALLY)