Well this post idea belongs to
Using :After and :Before Pseudo Elements :)
- Open Blogger > Template > Edit HTML.
- Now press
Ctrl +F and search for]]></b:skin>tag & paste below code above it..gadget h2{background-color:#D5D5D5;border-radius:20px 0 0 20px;color:#FFF;font-family:Verdana;font-size:14px;line-height:32px;margin:0;padding:0 0 0 20px;text-shadow:2px 1px 1px #222}.gadget h2 a{-moz-transition:padding .1s linear;-ms-transition:padding .1s linear;-o-transition:padding .1s linear;-webkit-transition:padding .1s linear;border-left:5px solid #fff;color:#101921;float:right;font-size:14px;padding:0 10px;position:relative;text-decoration:none;text-shadow:none}.gadget h2 a:hover{padding:0 32px}.gadget h2 a:before,.gadget h2 a:after{content:"height:0;position:absolute;top:50%;width:0}.gadget h2 a:before{border-bottom:8px solid transparent;border-right:8px solid #fff;border-top:8px solid transparent;left:-12px;margin-top:-8px}.gadget h2 a:after{border-bottom:6px solid transparent;border-top:6px solid transparent;left:-6px;margin-top:-6px}.gadget.blue h2 a{background-color:#A2D5EC}.gadget.blue h2 a:hover{background-color:#C5F0FF}.gadget.blue h2 a:after{border-right:6px solid #A2D5EC}.gadget.blue h2 a:hover:after{border-right-color:#C5F0FF}.gadget.yellow h2 a{background-color:#FCE98D}.gadget.yellow h2 a:hover{background-color:#FFD700}.gadget.yellow h2 a:after{border-right:6px solid #FCE98D}.gadget.yellow h2 a:hover:after{border-right-color:#FFD700}.gadget.green h2 a{background-color:#bada55}.gadget.green h2 a:hover{background:#C7E176}.gadget.green h2 a:after{border-right:6px solid #bada55}.gadget.green h2 a:hover:after{border-right-color:#C7E176}.gadget.red h2 a{background-color:#F0A5B5}.gadget.red h2 a:hover{background-color:#FFC7D2}.gadget.red h2 a:after{border-right:6px solid #F0A5B5}.gadget.red h2 a:hover:after{border-right-color:#FFC7D2}
- Now Hit Save Template.
- Now your CSS has been installed, you just need to add gadget in your HTML/JavaScript gadget from your layout section.
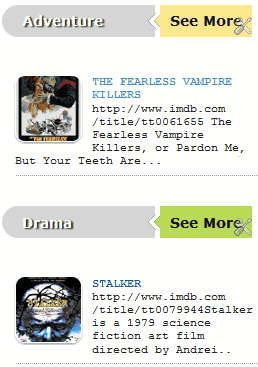
- Now just choose any code from below according to your color choice and change the title and link and you can add your own content into this gadget.
<div class="gadget blue">
<h2>Title in <a href="Link URL">Blue</a></h2>
Content code goes here :)
</div>
<div class="gadget yellow">
<h2>Title in <a href="Link URL">Yellow</a></h2>
Content code goes here :)
</div>
<div class="gadget green">
<h2>Title in <a href="Link URL">Green</a></h2>
Content code goes here :)
</div>
<div class="gadget red">
<h2>Title in <a href="Link URL">Red</a></h2>
Content code goes here :)
</div> - So that's it now Save your Gadget and refresh your blog to see this new awesome effect, so now you will see that transition + link hovered up :)