
Repairing broken links in google webmaster tools is a necessity for every blogger. You may have sent your blog sitemap to google webmaster tools and discovered numerous crawl mistakes. Some originates from deleted posts. If you have actually deleted a post and connected it in other article. When online search engine crawl your post, as connected to the deleted post would provide you a count in mistake. So let's discover the best ways to repair these url mistakes and other crawl mistakes in google webmaster tools.
Well now usually you might get the crawl error due to server issues or if you post is deleted and still linked to one of your post and anyone lese has your deleted post link then its created am issue and google webmaster tools tracks that link and shows you that the is showing 404 page. Well the trick we are going to use is to redirect your deleted post to another post or your homepage.
Redirect 404 Pages to Another URL
Well this is the easiest way to remove all those crawl errors, so lets see how you can attempt this trick to fix all the issues.
- Visit Google Webmaster Tools.
- Now click on your site and then it will show you all the errors.
- Press the Crawl Errors button and now you will see something like below.
- Now just click on the URL given below in the page.
- You will see the page like below.
- Just copy the URL after the website domain name like in the above URL you need to copy only the below part.
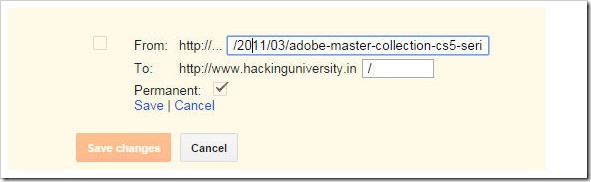
- That's it now just visit Blogger > Settings > Search Preferences.
- Under Custom Redirects click on the Edit option.
- Now press the New Redirect Button and then add the above copied URL in the first field and you post URL in the second field, if you wanna redirect that post to the homepage then you can leave the second field blank.
- Now press the Permanent Redirect and click on Save.
- Now you can once again resubmit the sitemap and faster indexing of your post URL and it will get the redirection URL.


/2011/03/adobe-master-collection-cs5-serial.html
Also Check Out: Automatically Redirect Blogger 404 Error Pages to Homepage
That's it now your redirect is up and who so ever comes to that post will get redirected to your homepage which is obviously available. Now when the google robots will scan again that URL they won't see any 404 error but they will be redirected to the working homepage hence that error will get fixed up automatically.
(COMMENTS WILL LOAD AUTOMATICALLY)