
Hey wazz up everyone so now another awesome tutorial on how you can create pricing tables for websites displaying your own packages for selling to customers worldwide, now these tables look similar to all those website such as Bigrock and others who try to display packages that your an purchase in order to run your campaigns on their websites. Well now if you run any trading website online then this could really help you out in displaying your own personalized packages with ease.
So now you can add your own packages, display your own points, you can even manipulate the styling if you are really good @ CSS but by default only we will be be providing you awesome created table that will fit well with your already running website. Well I would like to thankCreating Pricing Table Widget for Websites
So now this widget could be added to your blogger or wordpress blogs or even if you have any other awesome website you can add this to that too very easily. As this table is just comprised of HTML and CSS, so its loads fasts & looks awesome. So now lets just jump in on how to add this to your blog.
- Well the first you need to do is to add the HTML for this code, just copy the below code and paste it where ever you want this widget to appear.
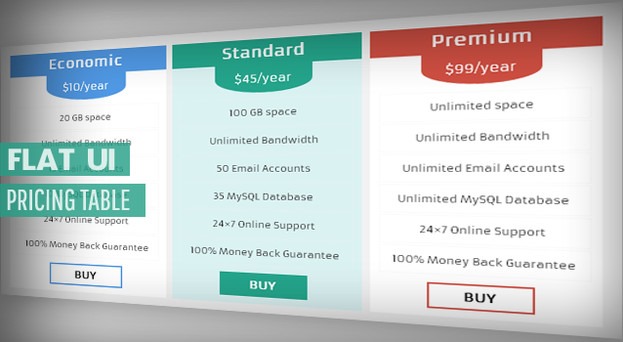
<div class="table economic">
<h2>Economic</h2>
<span class="price">$10/year</span>
<ul>
<li>20 GB space</li>
<li>Unlimited Bandwidth</li>
<li>15 Email Accounts</li>
<li>10 MySQL Database</li>
<li>24×7 Online Support</li>
<li>100% Money Back Guarantee</li>
</ul>
<a class="button" href="#"><span data-hover="Buy">Buy</span></a>
</div>
<div class="table standard">
<h2>Standard</h2>
<span class="price">$45/year</span>
<ul>
<li>100 GB space</li>
<li>Unlimited Bandwidth</li>
<li>50 Email Accounts</li>
<li>35 MySQL Database</li>
<li>24×7 Online Support</li>
<li>100% Money Back Guarantee</li>
</ul>
<a class="button" href="#"><span data-hover="Buy">Buy</span></a>
</div>
<div class="table premium">
<h2>Premium</h2>
<span class="price">$99/year</span>
<ul>
<li>Unlimited space</li>
<li>Unlimited Bandwidth</li>
<li>Unlimited Email Accounts</li>
<li>Unlimited MySQL Database</li>
<li>24×7 Online Support</li>
<li>100% Money Back Guarantee</li>
</ul>
<a class="button" href="#"><span data-hover="Buy">Buy</span></a>
</div> - Now we have added the HTML for this widget lets not design the widget using CSS, well I will be showing all the different parts of CSS that designs each and every element of this awesome pricing table.
- First of all we will be designing the whole .table layout, so below 30% width is added for every column, you can increase according to your site width. And I have alos highlighted the code in purple that defines the center column color, so you can change that too.
.table {
width:30%;
margin:0 10px;
background:#fff;
text-align:center;
float:left;
}
.table.standard {
background:rgba(0,245,255,0.1);
} - Now we will be designing the Titles of each package that's covered in H2 tag, so the creator has allotted the "Armata" font, you can change it to yours.
.table h2 {
color:#fff;
margin:0;
padding:5px 0;
text-align:center;
font:Bold 25px armata;
cursor:pointer;
z-index:999;
position:relative;
}
.table.economic h2 {
background:#4593e3;
}
.table.standard h2 {
background:#16a085;
}
.table.premium h2 {
background:#cd4436;
} - Now its time for giving some styles to the prices added below for each package, so you can change them to yours liking but check below code.
.table .price {
font:15px Armata;
color:#fff;
padding:10px 25px;
display:inline-block;
border-radius:0px 0px 100% 100%;
cursor:pointer;
}
.table.economic .price {
background:#4593e3;
}
.table.standard .price {
background:#16a085;
}
.table.premium .price {
background:#cd4436;
}
.table:hover .price {
border-radius:0;
} - Now lets give every point its own styling, so below code will be added for making it look more attractive when hovered over it.
.table ul {
margin:9px 0;
padding:0px;
}
.table ul li {
list-style:none;
font:15px Armata;
padding:10px 5px;
border:1px solid rgba(238,238,238,0.29);
margin:2px 10px;
}
.table.economic ul li:hover {
border-color:#4593e3;
}
.table.premium ul li:hover {
border-color:#cd4436;
}
.table.standard ul li:hover {
border-color:#16a085;
} - And the last that needs to tweaked is the BUY Button, well the creator has given an awesome animation effect that looks perfect and matched great.
.table a {
text-decoration:none;
display:inline-block;
overflow:hidden;
color:#000;
margin:1px 0 10px;
text-transform:uppercase;
}
.table a:hover {
color:#fff;
}
.table .button span {
position:relative;
display:inline-block;
-webkit-transition:-webkit-transform 0.3s;
-moz-transition:-moz-transform 0.3s;
transition:transform 0.3s;
padding:5px 35px;
font:Bold 20px Armata;
}
.table .button span::before {
position:absolute;
top:100%;
content:attr(data-hover);
font-weight:700;
-webkit-transform:translate3d(0,5px,10px);
-moz-transform:translate3d(0,5px,10px):
transform:translate3d(0,5px,10px):
}
.table .button:hover span,.table .button:focus span {
-webkit-transform:translateY(-100%);
-moz-transform:translateY(-100%);
transform:translateY(-100%);
}
.table.economic a {
border: 2px solid #4593e3;
}
.table.economic a:hover {
background: #4593e3;
}
.table.standard a {
border:2px solid #16a085;
}
.table.standard a:hover {
background:#16a085;
}
.table.premium a {
border:2px solid #cd4436;
}
.table.premium a:hover {
background:#cd4436;
} - So now pretty much we have added all the styles to design this widget, well now you need to get the whole CSS given above inside the <style></style> tags, this will allow the CSS to execute.
So now guys now I think I have explained everything is detail, well now you can easily create your pricing table and get more customer engage with your online services. Well if you still face any problem, do comment below, I will be happy to help you out.
(COMMENTS WILL LOAD AUTOMATICALLY)